Managing Processes with Trello


Trello is a fast-growing collaboration tool used by tens of millions of people. Aside from being great for personal task management, it’s used by teams and companies of all sizes to collaborate and reduce reliance on e-mail.
Unlike traditional process and project management tools, Trello doesn’t make many assumptions about your process, nor forces information to be structured in a certain way. This makes it very easy to use, suitable for a wide array of applications, and “agile” — it’s easy to refine your workflow as your understanding of the process evolves.
In this article, we focus on using Trello to manage business and organizational processes. We draw on best practices gathered from our experience helping thousands of customers automate their workflows with our tool, Butler for Trello.
Interspersed in the text, you will see a few grey boxes. These are actual Butler commands that you can use to automate your Trello workflow. You can ignore these boxes if you’re not a Butler user.
The terms process and workflow are similar in meaning and often used interchangeably.
In this article, we use the first term (process) to refer to the business or organizational process to be managed, and the second term (workflow) to refer to the actual implementation of a system to manage it using Trello.
A Basic Model for Processes
States and Transitions
We can think of a process as the progression of work items through different states, from an initial state to a final state.
For example, an Editorial Process may consist of progressing articles from an “Idea” state to a “Published” state through intermediate states “Research”, “Writing”, and “Editing”.
For this article, we will work through a Hiring Process example. Our process will have six states: “Resume Received”, “Phone Interview”, “On-Site Interviews”, “Hiring Committee”, “Offer”, “Welcome to the Team”.
Moving from one state to another state is called a transition. For example, a task may move from the “Resume Received” state to the “Phone Interview” state.
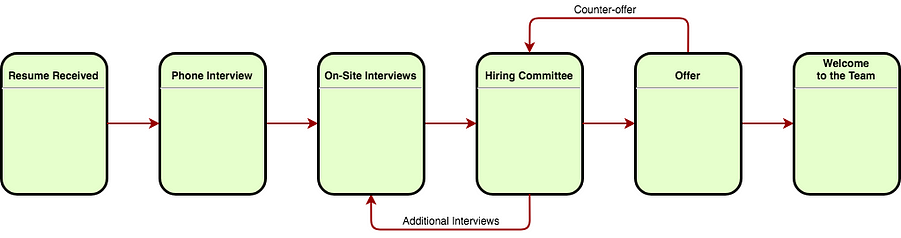
States and Transitions for a Hiring Process
In Trello, we can hold each work item in a separate card, and represent the states as lists. Moving a card between lists represents a transition between states.
Our base Trello workflow consists of creating a card for each work item, and moving the card from list to list until it reaches a final state.
Specifying Maximum State Duration
For a process to be effective, items need to reach a final state within a reasonable timeframe. This implies that each state needs to have a finite duration. A typical goal of process improvement is reducing overall process time.
In Trello, we can use due dates to help us manage process timing.
To specify a deadline for the current state of a work item, we give its card a due date.
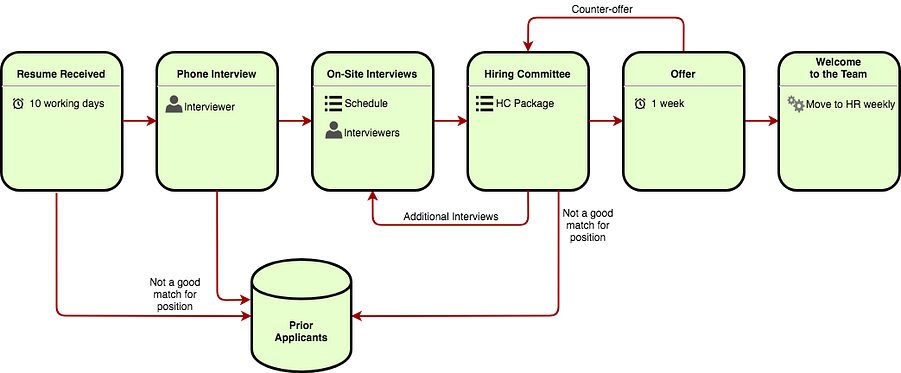
In our example, one of our goals may be to give an initial response to all candidates within 10 working days. We set a due date when an item enters the state in order to indicate this.
when a card is added to list "Resume Received",
set due in 10 working days
Trello due dates can be used to sort the cards in a list, and boards can be filtered by due date to see only cards that require attention. They can also be seen in the Trello Calendar power-up, and they generate notifications 24 hours before the time. Due dates can also be used for automation.
the monday before a card in list "On-Site Interviews" is due,
add @interview_coordinator to the card
and move the card to the top of the list
Assigning Items to People
In a human-driven process, it’s the responsibility of one or several persons to make sure an item moves from state to state until completion.
Trello cards can be assigned to one or more team members.
Use Trello card members to specify the person or persons responsible for the item in the current state.
In our example, when the card enters the “Phone Interview” state, we want it to be assigned to a recruitment coordinator, who will in turn assign it to a phone interviewer.
when a card is added to list "Phone Interview",
add @shivanshu to the card
In Trello, any member assigned to a card is also automatically subscribed to the card, receiving notifications about changes to the card and 24 hours before the due date (if the card has one).
Trello boards can be filtered to display only the cards assigned to certain member(s), and users can see a feed of the cards assigned to them in their Trello home page.
Do not add to a card members not directly responsible for progressing its current state. If someone is interested in getting updates, they can watch the card instead, which offers them notifications when it changes.
Keeping Track of What Needs To Be Done in the Current State
We want our states to be “chunky” rather than “trivial”. By this, we mean that a transition from one to the next should require meaningful work or changes to the work item. A chunky state often involves several steps or checks to be performed on the item.
A good way to track multiple steps within a state is a checklist.
We use Trello checklists to specify steps or checks to be performed on the item in the current state.
In our example, we use a checklist to track the interview schedule in the On-Site Interviews state, and we use another checklist to track the different materials we need to send to the hiring committee later on. We also use a checklist to track the different candidate checks (e.g. references) before issuing an offer.
when checklist "Interview Schedule" is completed,
move the card to list "Hiring Committee"
and add the "HC Package" checklist to the card
Because of the way Trello works, it’s best to pre-create checklists in a template card that doesn’t participate in the active workflow. You can leave the template card in the “About this board” list (described later).
Enriching the Workflow with Item Information
So far, we have introduced the basic process-driving elements: who (members), what (checklists), and when (due dates). They should be the focus of your attention as you start designing your workflow.
As it moves through the process, information about a work item and its processing will be gathered or produced. In our example, this information could be a resume, interviewers’ feedback, a candidate’s special status that needs to be accommodated for (e.g. a disability), etc.
As a by-product of the process, information about the item is gathered or generated.
Trello offers several ways to store this information in cards. You can skip these and come back later if you find them confusing at this point.
Attachments
You can attach files and links to a Trello card, which is obviously very useful to store item data, for example the candidate’s resume.
Importantly, you can also attach a link to another Trello card. We can store our job requisitions in another board (perhaps as part of another process), and link a candidate’s card to the relevant job requisition card.
Comments
Members of the board can post comments to a Trello card. Comments are useful to:
Communicate with other members about the card. Other members subscribed to the card will receive a notification when you enter a comment. You can also mention other members to bring the comment to their attention.
Keep a record of work performed on the item, e.g. a summary of a conversation on the phone.
Labels
In Trello, you can apply labels to cards.
A label has a color and, optionally a text. There can be multiple labels with the same color but different text. There is also colorless labels that only contain text and are not displayed at the front of the card.
We use a label to indicate a characteristic of a class or category of items, in as much as it affects the process.
For example, we can use a blue label named “Internal Candidate” to indicate candidates that already work for the organization.
Labels can also be used to differentiate between sub-states within a state (e.g. a green “Offer Issued” label for certain items in the “Offer” state), but if you can use custom fields (see below), we recommend using a dropdown custom field instead.
Labels are displayed in the Calendar Power-Up, and can be filtered and searched for. They are also great for automation.
Use labels as metadata, i.e. information directing the process, rather than to store item data. For example, it’s not a good idea to add a label with the phone number of the candidate to make it easier to find.
Custom Fields
Much of the information in business and organizational processes is unstructured. We will often want to organize some of it in order to facilitate the workflow.
A resume is an example of unstructured data. If I need to find the candidate’s phone number, or their highest academic achievement, I need to open the file and read it to locate the information. By contrast, in a structured system each individual piece of data is held in a separate field.
The Trello Custom Fields Power-Up allows us to define fields to hold structured data.
Aside from structuring some of the item data, we can also use custom fields to hold process information (metadata) in a way similar to labels.
Custom fields are also great for automation, because structured data is a lot easier for a computer to parse.
Refrain from trying to turn Trello into a database by structuring every single piece of information. Move into custom fields only the information that directly affects the process.
Designing a Trello Workflow for your Process
When it comes to implementing a workflow to manage your process, we recommend following these steps:
Create a Trello board dedicated to the process.
Add a first list named “About this board”. Add a card to the list describing what the board is about. You can later add cards to this list with answers to frequently asked questions and any process documentation.Define the units for your process.
In our example, each candidate constitutes a process unit. Once we have our workflow up and running, we will create a Trello card for each candidate as they apply, attaching their resumes and cover letters to the card. Cards can also be emailed directly into this list using Trello’s email-to-board feature.Define a few meaningful states for the work items in your process. Decide what causes a transition between states. These must be reasonably large changes (see best practices below). Create a Trello list for each state.
Define a few workflow-driving elements (due dates, members, checklists) that need to be present in the item for a given state. Create initial checklists on a template card in the “About this board” list, and invite the people that will participate in the process to the board (or invite/remove them from the board later as needed.)
If you think that you want to add some labels or define some custom fields to hold structured information, go ahead and do so, but remember that you will be able to add them later too.
Best Practices in Trello Workflow Design
Don’t Overthink It
Creating a workflow often has the side effect of making you think about your processes in detail. This usually has a positive effect, but don’t overthink it.
Human-driven processes are fluid and evolve as we encounter exceptions and adapt to change. Trying to cover every corner case or make your workflow watertight from the outset is a recipe for frustration.
Start out by creating the simplest base workflow that works for the most typical case. Do not optimize the process for edge cases or try to cover every eventuality from the get-go.
Take Advantage of Trello’s Flexibility
The beauty of Trello is that it’s not a straightjacket: if your base workflow covers 90% of the cases, you can create an exception list to handle special cases separately, or create a label to mark a type of exception. If a standard checklist doesn’t contain a few items you need for some special case, you can simply add the items to the checklist on that card only.
For example, a candidate may have interviewed with us in the past, and we only want to do two interviews instead of our usual three. We can simply edit the checklist in their card to remove the third interview.
Trello is best for organizing human processes, which are often fuzzy and variable in nature.
For people used to more strict process management software, Trello’s flexibility and open access can be unnerving. There is a tendency to try to “lock down” the workflow to prevent other users from straying away. This is an uphill battle in Trello, which is designed with open cooperation in mind.
Too Many States is Too Many
Try to limit your process to a reasonable number of meaningful states.
Instead of a single “Offer” state, we could have states for “Preparing Offer”, “Waiting for Offer Approval”, “Offer Issued”, and “Response Received”. This is clearly too many.
It’s better to mark these sub-states with labels, and filter or sort by label to see how many are in each situation within the current state.
A rule of thumb is if you can substitute the word “stage” for the word “state” and the states still sound chunky or hefty enough. Compare:
We have 5 people at the “Offer” stage, of which 2 have been issued an offer.
We have 3 people at the “Preparing Offer” stage, and 2 people at the “Offer Issued” stage.
In the second example, it sounds like our stages are very small. Although this is a subjective matter, the point is not to create micro-states.
Use (Or Not) Card Archival as a Final State
Every item must reach a final state in the process eventually. In a well-run process, items don’t hang around in middle states forever.
Finished items shouldn’t hang around either. Once your card has reached a final state, it’s best to remove it from view so that it doesn’t distract from running the process. A way to do this in Trello is to simply archive the card.
Archiving removes the card from view, but preserves all the information in it and lets you find it later by using search.
Archiving is enough for many workflows. But if you run a high-volume process, likely to generate thousands of cards over time, and periodically need to consult past work items, it will become a needle-in-a-haystack situation. In this case, we recommend to move the processed cards to another board instead of archiving them. The cards should be placed in a different list for each week or month, making it easier to find them by processing date.
every sunday, move all cards in list "Rejected Applications"
to list "Applications for week #{weeknumber} {year}"
on board "Process History"
This also makes it easier to comply with data retention policies: you can simply delete the history board and re-create it periodically to delete all cards in it.
At the end of the process, archive your Trello cards or move them to a separate history board.
Schedule is (Generally) Not a State
It’s tempting to use Trello as a team To-Do list and define your states by date: have states for “On-Site Interviews This Week”, “On-Site Interviews Next Week”, “On-Site Interviews This Month”, etc.
But these are not actual states. The fact that the interview is later this month doesn’t change the fact that the candidate is in the “On-Site Interviews” stage of the process.
Instead, use sorting and filtering by due date, and the Calendar Power-Up to have a temporal view of what needs to be done next.
In general, do not let time define your states. “Due this week” is not a state.
There is an exception to this, which is when time does substantially change the state of an item. For example, in an Editorial Workflow, stories scheduled to be published tomorrow are qualitatively different from stories that haven’t been given a publication date.
It’s Process, not Project
If you find yourself defining a workflow that involves a final date based on a cascade of task dependencies, then you need to think about project management, not process management.
Process management is concerned mostly about repeatability.
Trello is also great for project management, but it’s a different use case. Of course, you can have a process for project management to make sure you run projects consistently. We think that deserves its own separate article.
Iterate and Conquer
Once you’ve created an initial workflow, run the process with it for a while and gather experience. As you learn what works and what doesn’t, make incremental changes.
Managing a process is a learning process in itself.
For example, you may realize that a checklist is unnecessary, or that two states end up being the same and you need to merge them. You may want to add a custom field to store a piece of information that users find useful for the process. Etc.
Let what works best for your users evolve the design. Keep it simple and don’t lose focus on the most frequent use cases.
Using Automation
Once the workflow has been implemented and is running for a while, it’s normal to notice repetitive actions being performed all the time. At the end of the day, a process is about consistency and repeatability.
Automation can free you from many monotonous tasks by:
Applying rules that automatically set due dates, add checklists, set due dates, etc, as cards change state.
Performing scheduled chores such as moving cards in final states to other boards.
Having Trello actions done automatically improves consistency and reduces human errors. Automation can also improve process quality by validating transition conditions and capturing workflow errors.
when a card with checklist “Interview Schedule” incomplete is moved to list “Hiring Committee”,add the yellow “Process Warning” label, and post comment “@board Interview Schedule was not completed before move to Hiring Committee state."
Just like when designing the workflow, our recommendation is to start simple. Focus on automating the most important cases and don’t try to cover every eventuality. Iterate and improve over time.
Automation reduces repetitive work and improves process consistency.
Conclusion
Trello’s capabilities make it a great tool for managing processes, particularly those that are fuzzy and have high variability.
In this article, we’ve described a basic model for processes, and how to design a Trello workflow for them. We’ve also shared best practices learned through our experience. Finally, we’ve touched on workflow automation.
You can find a sample board related to this article here.
Thank you for reading. We look forward to your feedback and questions.